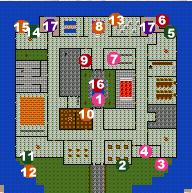
Upon first entering the Monastery of Madness go straight north into the courtyard. This will cause some Mad Monks to appear.
As you explore the Monastery be aware that there are Monks wandering pretty much everywhere, so be prepared to bump into one at any time. Check the ground after each battle, as one or more of the monks will occasionally drop a Ring of Pure Focus. I also suggest reading all the signs on the wall, since some of them are pretty funny.
The first room to the south in the eastern passage from the entry is a Memorial room, with lots of statues. There's a secret passage directly south of the southeastern statue in the room. You'll find a Mad Monk out here.
The room just to the east of the statue room is a storage chamber of sorts. Each of the chests contains a different monster, two of whom drop items. The western chest contains an Elder Aranea which drops a Shard of Release, the middle chest contains a Basilisk and the eastern chest contains a Roiling Mass which drops an Assassin's Ring.
To the east of the storage room is one of the sleeping rooms for the Monastery, with a couple Mad Monks in it.
North of the sleeping room is the training hall, with more Mad Monks. It's usually one of these who drops the Ring of Pure Focus.
West of the training hall, across the main hallway is the Rock Throwing Room.
Just north of the training room is the Dining Hall, with yet another set of Mad Monks in it, and a pantry leading to the north where you can pick up a little bit of food if you're running low.
West of the dining hall, again across the main hallway is the Firewalking Room.
North of the dining hall is another sleeping chamber, but this one has a secret passage in the northeast corner of the room, which leads out to a suit of Steel Chain Mail.
West of the sleeping chamber, across the main hallway is a storage room guarded by a Basilisk. Kill the Basilisk and see if there's anything you want from in here.
North of the storage room is a stairway leading upwards, which you want to ignore for now, but this leads up to the upper level of the Monastery.
West of the stairway is the Anvil Throwing Room. Take note of the rune in the northwest corner blocked by some anvils.
West of the anvil room is an altar. Performing the Ritual of Sanctification here gives you some experience and causes the appearance of more Mad Monks, some of whom are hostile, and some of whom are friendly. Make sure you don't kill the friendly ones, as they'll aid you by wandering the halls and occasionally killing Mad Monks they come across.
Slightly to the southwest of the altar, across the main hallway is another storage room. One of the crates in here contains a Dexterity Charm, and they all contain some food items.
Just west of the altar, on the same side of the hallway is a room with what appears to be a pool of acid. Walk across the bridge for a little surprise.
West of the acid room is the other set of stairs leading to the upper level, but again, pass them by.
West of the stairs is another sleeping chamber, but for now, just pass it by and go to the room just south of it on the same side of the hall. This is my personal favorite of the testing rooms. Read the sign by the door, then attempt to jump up the tree.
South of the tree room is a room where the Monks apparently punish themselves and/or meditate. There's more Mad Monks in here.
The next room to the south is one of the training halls for the monks. Yet again, there's a few Mad Monks in here.
Across the hall from the training hall is the room where the monks practice with javelins, but it's empty.
Now go back to the entrance and enter the room to the northwest of the entryway. Read the bookshelves in here to learn some Gymnastics skill.
Just to the south of that room is a room with some books on a pedestal. The titles are somewhat amusing, or disturbing, depending on your point of view.
West of the book room is the last of the sleeping chambers on this floor, and it too is occupied.
In the southwest corner of the room is a secret passage, this time leading to a rune on the ground. Step on the rune and then make your way back to the anvil room where you'll find you can now reach the rune in here. Step on it too, and then make your way to the northwest corner, to the sleeping chamber I told you to pass by a couple minutes ago. Kill the occupants and then check the northwest corner of the room for another secret passage leading to a third rune. Step on this rune and then make your way to the central courtyard. Walk out onto the dock in the pool, and you'll receive a suit of Blessed Plate Mail.
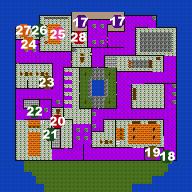
Now head over to the stairs of your choice and make your way up. It doesn't matter which stairs you choose, since they both lead to the same room.
The upper level has lots and lots of Mad Monks running around, including some Masters, so be prepared for a few tough fights.
Immediately start making your way to the southeast corner of the map. There's a cracked wall down here, which you need to use either Move Mountains or a Stoneshatter Crystal on. Once the wall comes down there will be some Vengeful Shades revealed, guarding a tome. Kill the shades and read the tome to learn Unshackle Mind Lv.3.
Now make your way towards the southwest corner of the map. In the southwest corner of the map is the main meeting area for the Mad Monks, but right before it, on the north side of the hallway is a curtained doorway leading to a sleeping chamber. The dresser in here contains the Divine Fire Spellshard.
In the meeting room itself, along the eastern wall, is a secret passage. Don't bother trying to get through he barrier, as the chest is empty anyway.
Leave the meeting hall to the north and you'll see another section of cracked wall. Taking down this wall leads to another barrier blocking access to another empty chest. I'd suggest saving your spell points.
Follow the main hallway around until you reach a doorway leading south near the northwest corner. The door leads to the Monastery Library and in the southeast corner is a tome with a scrap of vellum between some pages which teaches the Knowledge Brew recipe.
North of the library is a short passage which will only allow you to send one character through. You're going to have to fight a pretty tough battle before you can rejoin your party, so choose who you send wisely. The battle with some Mad Monks starts when you step on the mat that's by itself on the west side of the room. The Master drops a pair of Boots of Speed, which you want to pick up.
On the western wall of the room is another cracked section of wall. Break down the wall and read the plagues on the north wall of this small chamber for some tributes to Kung-Fu movies.
The door leading east out of the main room takes you to the treasure for the Monastery, which is pretty lame, for a treasure trove.
Now go rejoin your party and leave the Monastery, hopefully after having gotten a few giggles out of the experience.