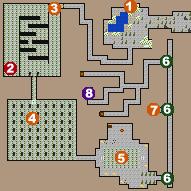
This is a rather complicated level with quite a few puzzles to solve, so if you're having problems be sure to follow the directions exactly. This is also the place you learned about from the soldier in Angel's Rest who sold you the map for the location of the Black Halberd. The maps a bit of a pain however, since you have to turn your head 90 degrees to read it properly.
Start by looking for the patch of differently colored mushrooms along the northern wall. If you're having problems finding the mushrooms the other way to go about it is to line your party up against the north wall, making sure that your leading character is lined up with the blocked passage to the south using the mini-map to make sure they're aligned correctly. Once you have them in the right spot walk directly south, through the stalactites and into the passage.
When you reach the end of the passage you'll find yourself in a curved hallway with a rune at one end, near where you enter, and 8 crates at the other end. Take one of the crates, it doesn't matter which one, and push it along the passage back to the rune. Once the crate is over the rune look inside and you'll find a Passage Stone. This unlocks the door at the south end of the middle section of the hallway.
When you open the door advance carefully, making sure that your lead character is standing on the special tile near the entrance. Stepping in the wrong direction off this tile will cause the room to be filled with a Cloud of Blades, and stepping in certain spots on the floor will cause the appearance of some Spine Beasts. Once you're at the start point take 2 steps south, 2 steps east, 2 steps south, 1 step east, 2 steps south, 4 steps west and then 2 steps north. This will teleport you into the next room.
In this room take note of the runes and the braziers lined up on the platform. Don't step on any of the runes except the sixth one, going west from east. This will make it so that 6 of the braziers are lighted and will open up a passage to the east of the room.
When you get through the passage start walking north, and use Far Sight to locate the first secret passage to the west. This is very important, because if you don't step on the stalactite in this room you'll never reach the second passage, no matter how long you walk.
Go through the second secret passage and down the ladder to the lower level. The other two ladders leading down take you into a Drake's lair, which you can only get out of by taking a long drop, and then exiting to the outside, which means you'll have to do the entire upper level over again.
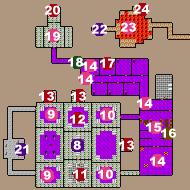
When you first enter the lower level you'll be in a square room on a platform. The layout can be a bit difficult here, but I usually head out the door to the south and then move around the rooms in a clockwise direction.
The room directly to the south of where you entered contains a Poison Elixir in the middle of the room, which you just leave there, since all it will do is poison you if you use it.
The room to the east of the last room contains two Basilisks and a platform with two pots on it. The pots contain some potion-making herbs, and so do the other pots in other rooms, so check them all.
North of the Basilisk room is an empty room with a lot of blood on the floor.
Instead of heading north to the next room, head back to the room with the basilisks and out the door to the west. Go around this short loop, taking note of the teleporter, but don't use it until after you've completed the level, since it will dump you into the same Drake lair the other two ladders from the upper level did.
If you follow the loop around you'll come to the room north of the empty room with all the blood. There's a couple more Basilisks in here, and a couple more pots. There's also a door to the north, which you want to open. There's a small cell here, with a few items, including a Blessed Bow and some Blessed Studded Armor.
Now head east out of the Basilisk room and you'll find yourself in a room with a coffin. The coffin contains a Ring of Vulnerability which you don't want. There's another cell to the north of this room, which, again, you want to check out.
Head east again, but be prepared for a bit of a fight. There's a couple Gazers and some Spawned Fungus in this room. Concentrate on killing the Gazers first, since they're the ones that will drain your spell points.
For now, ignore the door leading west and go south. This takes you to another empty room, but this one has a cell on the east side to check out.
Head south one more time and you'll have to fight a couple more Gazers and a few more Spawned Fungus.
Now head east out of this room to enter the Rakshasi Lair. There are lots of Rakshasi in here, so this is probably going to be a pretty tough fight, especially if the Gazers managed to drain a lot of your spell points. Rakshasi are also fond of summon Gazers, as well as Demons, so have fun.
Once you've killed the Rakshasi in this room head north to fight even more Rakshasi and a Haaki. The Haaki will drop a Chill Charm when slain. Explore the bookshelves on the eastern side of the room. One of them teaches the spell Repel Spirit Lv.3, so you can now use Repel Spirit to kill Demons.
Head north again and you'll find yourself in a long Z shaped hallway, with yet more Rakshasi. The first Rakshasa is standing to the west of the doors you entered through, and the rest are gathered at the end of the top bar of the Z shaped hallway.
The room directly to the north of where you entered is where the Rakshasi keep their cats, but the cats themselves aren't hostile.
Along the top bar of the hallway are several bedrooms, with a variety of items, including Skribbane Herb in many of the dressers. The second to last bedroom to the north contains the Cloud of Blades Spellshard, and the room beside it contains a Rakshasa and a secret passage in the northwest corner.
Go through the secret passage, past the portcullis towards the door. When you're almost at the door you'll be ambushed by some Mutant Lizards and Spawned Fungus. Once they're all dead, head through the door to the treasure area. The middle chest contains the Black Halberd.
Once you have the Halberd go over to the teleporter and into the Drake Lair. Kill the Drakes and check the body in the northeast corner for a Resistance Charm, then down the drop and outside. Duck back into the Remote Cavern to pick up your horses if need be.