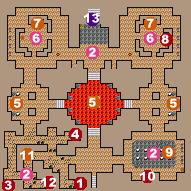
When you first come down the stairs from the Main Level you should immediately head to the west. There's an Arcane Shield Spellshard around the corner, blocked by some Mossy Boulders, which you need Move Mountains Lv.3 to get past.
Continue making your way towards the southeast corner of the map, fighting some Golems near the corner. Take note of the deactivated laser near the Golems.
In the southeast corner is a vertical mirror behind some more Mossy Boulders, but you won't need that one on this level, so it's best to save your spell points.
Head towards the north now, watching for a passage leading back east. This passage is blocked by even more Mossy Boulders, but behind the boulders are a few items on the ground where a humanoid apparently got crushed by a rockfall.
I'd suggest going into combat mode now, and staying that way until you've destroyed all the Spawning Crystals you can on this level. The first two Crystals are on the western wall about halfway up, and there are two more directly opposite them on the eastern wall. Halfway between, in the lava pit is a fifth Spawning Crystal.
Once you've destroyed these five go out of combat mode and head to the northwest corner of the map. There's a small room blocked by some barriers here. Once you've passed the barrier a trap will trigger releasing a Demon Golem and four Jeweled Golems. Dispose of the Golems and then check out the control panel in the north of the room. When prompted to do so, push the button.
Next make your way to the northeast corner of the map, taking a detour through the lava pit if you wish to kill the Golems in the middle.
In the northeast corner repeat what you did in the northwest corner, right up to triggering the trap, but after you've pushed the button on the control panel check the northern of the two dressers for a Blue Crystal Key.
Finally, enter combat mode again and head down to the southeast corner of the room. There's a few more Golems standing here, and some moe Spawning Crystals, but unfortunately these ones are shielded so you can't break them.
Staying in combat mode get the round mirror that's behind one of the barriers along the southern wall and push it back to the laser I told you to take note of earlier. It should now be active and you can use the mirror to redirect the beam towards the rocks to the south. This will break them, allowing you access to a body wearing a suit of Prismatic Mail.
The last thing of note on this level is the tunnel directly north of where you entered. This leads outside to the fourth Golem Spire, but you can't get through the beams blocking the tunnel yet. Take note of the lever just to the west of the tunnel itself. When you return after destroying the last Golem Spire you're going to have to pull that lever to deactivate the beams blocking your path.