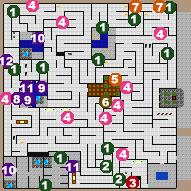
This level is a PAIN. Before you even begin look at the maps to try to familiarize yourself with the locations of the secret passages and the locations of cracked walls. I chose not to mark the locations of all the Undead, since the map would have been a solid sheet of pink if I had. Just assume that you're going to bump into some Undead around every corner and you'll be fine, because chances are, you're going to. The other fun thing about the Tower is that it drains your spell points as you go through it. You'll find lots of potion-making herbs throughout the level, and I suggest using them to make energy potions.
The easiest way to do the Tower is to enter from the rear and just make a beeline through the secret passages and teleporters to reach the lower level, but doing it that way you'll miss picking up the Rogue's Leather and learning Summon Aid Lv.3. Assuming you don't mind missing those things, just use the Orb of Thralni to line yourself up with the rear of the tower. When you enter you'll be standing right next to one of the Undead Spawning platforms. These things are horrible, because they spawn another undead pretty much every turn. The easiest way to deal with them is to enter into combat mode as soon as possible and stay that way whenever you aren't actively using telelporters or going down ladders.
Go a little south and a little east and you should see a teleporter to your north. Go through this teleporter and you'll be teleported across the water to the teleporter to the northeast of the one you started at. There's a secret passage to the north of this teleporter, which you want to duck through.
Make your way north until the passage is blocked by a statue. You can move diagonally across the chasm and past the statue into another passage. Follow this passage north and then west until you're almost in the northwest corner of the Tower. Check out the southern section of wall here, and you should find another secret passage which leads to another teleporter.
Going through this teleporter takes you to a seperate section of the tower. Ignore the first few teleporters and just make your way to the southeast corner of the first room, past the barrier to find a secret passage. Near the northwest corner of the next room is another secret passage leading to another teleporter. You want to use this one.
When you finish teleporting you should be north of the first teleporter you used, with a small passage to the west. Enter this passage and look for a secret passage in the northern wall. This takes you into yet another passage with a trapdoor guarded by some Undead. Going down this ladder takes you into the Lower Tower of Zkal, which I will cover after I finish explaing what to do if you want to get the Rogue's Leather and Summon Aid Lv.3.
If you want to get the Rogue's Leather and the spell things are a bit more complicated. I strongly recommend that you familiarize yourself with the locations of the secret passages, and take note of the locations of the Undead Spawning Platforms. If you're opting for this route you'll find quite a few Energy Potions scattered around, which you're definitely going to need. Go into combat mode right away, and stay there until you reach the teleporter which leads you to the seperate section of this level as described above. Once you've reached that section you should follow the instructions in the last two paragraphs above.
When you first enter the Tower from the front immediately head to the southeast corner of the Tower. Go through the passage leading west out of the room with the pool and you'll find yourself facing a Vampire across a chasm.
Once you've killed the Vampire go through the passage to the north and stand to the south of the chest. Use Move Mountains to bring down a few sections of wall, and check the chest near where the Vampire was to get the Rogue's leather.
Head out the northern section of the wall you brought down and head towards the north. There's a Spawner right ahead of you, which you want to sneak around if possible. Head around the corner until you're going west, and when you get near where the passage switches around a corner and starts east again, start checking for secret passages against the southern wall. You'll need to use Dispel Barrier to reach a chest in here, with yet more Energy Potions. There's a cracked section of wall just to the south of the chest, so use Move Mountains and enter the next passage.
Head west and then north, going west again as soon as you can, until the passage dead ends. Head north here until you see two coffins and a Spawner platform, then head east in the same passage as the coffins. As soon as you can head north again, watching for a curtained doorway to the east. When you enter this room approach the statue in the northeast corner and move it when given the option to do so. This will raise a portcullis in another section of the Tower.
Now head back to where you had to break down the wall and barrier, and back through the secret passage. Follow the passage north as much as possible until you reach the end. There's a pillar here, which used to be blocked by a portcullis. This pillar teaches Summon Aid Lv.3 the third time you read it, but the first two times you read it will drain you.
Once you have the spell make your way back to the entrance and head north. Make your way to the northeast corner of the tower. There's a secret passage here in the western wall, which leads to a lever controlling another portcullis.
Go back south until you reach the first passage leading west and north. Follow this passage through the now unblocked portcullis and to the south until you come out into a room with some water seperating two grass covered platforms. There's a secret passage against the northern wall here, which you want to go through.
Make your way west towards the northwest corner of the Tower, where you'll find a secret passage against the southern wall of the corner. Go through here to reach the teleporter which leads to a seperate section of the tower and follow the instructions above.
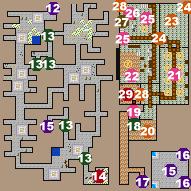
Once you reach the Lower Tower of Zkal things get a lot less complicated. This first section of the lower Tower has a lot of Undead as well, but no Spawners. There's also potion-making ingredients lying around on the ground.
Check the map for secret passages, particularly the two off the southeastern chamber of this section. The southwestern passage leads to a room with a lot of bodies carrying some pretty nice items, including a War Charm. The northwestern passage off of this room leads to a teleporter.
This teleporter takes you to a room with the teleporter you arrived through in the center, and one in each corner. Ignore the two western teleporters. Go through the northeastern teleporter twice, the southeastern teleporter once and the northeastern teleporter one last time. This will teleport you yet again.
You've now arrived in the heart of the Tower. There are two beams in the passage you have to go through, so I suggest hasting your party and entering combat mode. Hopefully you'll be through the passage before the beams turn on.
In the alcove to the east is a cracked section of wall with two Basilisks and two mirrors behind it. Take note of the runes on the floor near the eastern wall and steer clear of them. Place the mirrors so that the round mirror is against the western wall of the passage with the two beams, and the straight mirror is lined up with it. Try to time it so that you can line up the mirrors without the beams coming on, and have your party clear by the time the beams light up. I suggest starting with the western beam in the alcove and moving the straight mirror east one step once the first crystal has been destroyed. Make your way along until you've destroyed as many of the beams as possible without stepping on the runes, which should be all but the easternmost crystal. Now push the straight mirror until it's right beside the round mirror, which should destroy one of the two crystals in the main hallway. Now push the straight mirror all the way down to the far eastern end of the alcove. Don't worry about stepping on the runes, since you've destroyed all but that one crystal now. Once it's destroyed retrieve your round mirror and put it in the alcove for now.
Go through the passage to the north, and enter the room to the east. There's 8 Hraithes in here which you'll have to destroy. Once you've done that head into the room just to the north of the entry to find some Spawned Fungus.
Now go get your mirrors and take them into the room just north of where the Hraithes were. There's more runes in here, which will trigger more lasers. This one is a bit more tricky, and I don't think there's anyway to avoid being hit by at least some of the beams while you destroy as many as possible. Take note of the lever behind the crystals, and then look at the way the crystals are set up. There should be a section near the middle that you'll be able to step through diagonally, so destroy the middle crystals at least, if you don't want to take the time to destroy as many as you can.
Once you've reached the lever, pull it and then head through the portcullis to the west, which should have been raised. You'll find a couple Demons in here and, up on the platform, Zkal himself. Kill them all and then use Dispel Barrier to go up onto the platform where Zkal was standing. There's a book on the bookshelf, and one on Zkal's desk, both of which teach Spray Acid Lv.3. There's also a lever in the northwest corner.
Pull the lever and then make your way back to the entrance of Zkal's chambers. The portcullis to the west should now be open, so go through and check out the chests, all of which are trapped. They contain a variety of nice items, including a Perfect Flower, in case you still don't have one for the Dryad in Krizsan Province, and the Ring of Endless Magery. Once you have those items it's time to make your way out of the Tower of Zkal, and good riddance.