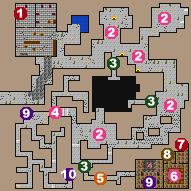
When you first enter the Pit of the Wyrm you'll find yourself facing a building that seems to have been partially torn apart. There are two bedrooms to the north of this room, the western one apparently blocked by a magical rune. Don't worry though, the rune was poorly executed and doesn't do anything.
Inside the western room is a Light Spellshard, as well as couple other items. In the corner of the book is a tome on a pedestal which you can read. Doing so gives you some insight into what's happened here.
Once you're done in this building head towards the east. There's several rooms containing Augmented Giants along this passage. These guys are pretty tough, but with a little effort you should be able to get through. Check the chests in each room, because once in a while you'll find some Rough Diamonds mixed in with the rocks.
Check the map to see the locations of some secret passages leading to a view of the Lower Pit, though you don't actually get a view of the Lower Pit.
To the south of the last room containing Augmented Giants is another secret passage. This one leads to a very long drop. Unfortunately, the only way to get the Red Scale Armor and Mass Curing Lv.3 is to take this drop.
Once you go down you'll find yourself in a room with a teleporter, which you want to ignore for now, and a doorway to the east. Through this doorway is where the Priests evidently used to make sacrifices to the Wyrms below. You'll have to fight some Abyssal Slimes and a Spectral Overpriest here.
To the north of this room are two more rooms. The western room contains a bookshelf which teaches the spell Mass Curing Lv.3. The eastern room contains a little alcove in the northeast corner with a chest. Inside this chest you'll find the Red Scale Armor.
Now go back to the room with the teleporter and it will transport you up onto a ledge, which you'll have to jump off. Before you jump off the ledge look below and see if you can kill any of the Abyssal Slimes that are all over these tunnels.
Once you've dropped off the ledge you'll probably have to fight more than a few Abyssal Slimes, as they're around pretty much every corner in here. Make your way to the southern section of these tunnels, and then move east until you reach the ramp leading down to the Lower Pit of the Wyrm. That's where the real fun is.
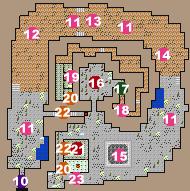
When you first enter the Lower Pit you'll find yourself fighting yet more Abyssal Slimes. Curse at them all you want for now, because in about one or two minutes you're going to be fighting something a lot harder. Check the ground throughout these tunnels, as you'll sometimes find potion-making herbs on the ground.
Keep moving towards the north, down a set of stairs and a little bit further. Soon you'll find yourself facing a couple Spine Beasts (yawn) and a couple Dark Wyrms (eek!).
A little bit of strategy for dealing with Dark Wyrms. Try to position your fighters right next to the Wyrms while fighting them. They'll still hurt you with their physical attacks, but it's a lot better than getting hit with Darkness Breath two or more times per round.
Once you've killed the Spine Beasts and Dark Wyrms head east, where you'll have to fight more Abyssal Slimes at the top of some stairs. I bet they don't seem quite so hard anymore.
Once you get past the stairs keep heading west until you find a few more of those Abyssal Slimes. Now head back west, because some Spine Beasts are going to try to sneak up behind you, and you want them out of the way before you go around the corner.
Once you've dealt with these annoyances head around the corner to find a couple more Dark Wyrms.
South of the Dark Wyrms is another set of stairs, with yet more Abyssal Slimes at the bottom. There's quite a few runes on the floor in this section, but I've never been able to figure out what they do, or even if they do anything.
Around the corner to the west is the really fun fight. There's several Dark Wyrms and a couple Unholy Wyrms around an altar. The unfortunate part is that they're spaced out so that you can't position your fighters next to all of them, so no matter what you do you're going to find yourself hit with Darkness Breath a lot here. I suggest holding your Priest back to do nothing but cast healing on your party. I've heard that Heroic Brews are quite useful when fighting Dark Wyrms, but personally I'd rather have lots of Invulnerability Elixirs.
Once you've killed the Wyrms finish exploring this area, remembering to check for potion-making herbs on the ground.
To the west of the altar is a large square area, but there doesn't appear to be an entrance to it. There is an entrance, but it's hidden, so now we'll go find how to open it.
To the north of the room is another room with some Mung Slimes in it, and quite a few bodies. They carry some pretty nice items, including an Assassination Charm. Once you're done checking the bodies check the southeast corner of the room for a secret passage. This is a long fairly curvy passage, with Spine Beast scattered along it's length.
When you reach the end you'll be in a long hallway with doors on the eastern wall. The first three doors contain Crypt Zombies guarind their Crypts. These contain a couple potions, including an Invulnerability Elixir that would have been nice a few minutes ago.
The last room in the hall contains a lever. Pulling this lever will cause a door to appear in the southwest corner of the room near the altar, so now make your way back to room and open the door.
Before entering take the time to look at the tiles on the floor. There's another door in the northeast corner of this room, and as you make your way towards it you want to step only on the tiles that are the same as the one that was directly east of the first door.
When you go through the second door steer clear of the tiles around the table in the middle. You don't need to be right next to it to pick up the Fury Crossbow or the Blessed Bolts. As soon as you pick up the Fury Crossbow some Spine Beasts and a couple more Dark Wyrms will appear outside the building.
Use the lever to open up the walls blocking a staircase just to the north of this building and then leave the building. Unfortunately, some of the floor tiles will have shifted so there isn't anyway to avoid being damaged by the traps that will be triggered when you step on tiles other than the ones that you crossed over the first time. The plus side is that the Dark Wyrms and Spine Beasts that appeared outside the building also get damaged every time you trigger one of the traps, though I don't know why that is.
Once you've killed the monsters summoned by your taking the Crossbow go to the stairs that just became available and up them. You'll find yourself right near the entrance to the Lower Pit, so go up the ramp leading back to the top level and you should be finished.