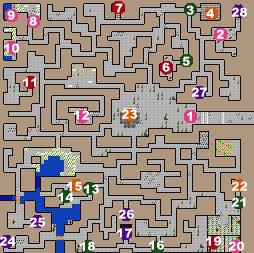
**I usually try to cover the entire Upper Level before advancing to the lower level, and I'm writing from that perspective. Also note that there are slimes through this entire level, and that there are also items randomly scattered through the tunnels, usually arrows and javelins.**
Upon first entering the Slime Pit you'll be ambushed by a large group of slimes. Once you've dealt with them, go into the main room. You'll see a pit at the Western end of this room, with a control panel in the center. This panel controls access to different areas of the Lower Level. Buttons on the panel roughly correspond to the locations of the passages down to the Lower Level.
There are five tunnels leading off of this room. Go down the tunnel in the far Northeastern corner first. The first side tunnel to the east leads to one of six passages leading to the Lower Level. Don't go down there yet, but take note of the location. The second side branch leads to a large room with a few slimes in it. Go back to the first tunnel and continue northwards. The next sidebranch is a room with a few slimes and a lot of dead bodies. Don't step on the bodies, or examine them more closely, as this will disease you. Do use the get button to check for items in this room though, as there are a few minor items scattered around. Take note of the second passage leading down to the Lower Level. Continue up the tunnel to the north, and you'll soon find that the tunnel bends to the west. Push against the Eastern wall here to enter a secret room with a hint about the slimes. If you continue following the tunnel east you'll see a small side room with three chests. You need either Dispel Barrier Lv.2 or a Piercing Crystal to get in there, but the chests contain a Healing Potion, a Strength Potion and a Haste Potion.
Back into the tunnel and head back to the east. Go down the first tunnel to the south, and then take the first branch to the east. You'll find yourself in a small alcove. Examine the walls on the western side of the room to enter a secret area where several Empire soldiers died. There's a few goodies in here, particularly some armor. Now head back into the branch leading south. If you continue along here you'll come back to the main central room with the control panel.
Head out of the main room along the passage leading to the northwest. When you get to the branch in the tunnel go north. The passage leading off to the west has several non-hostile slimes, who are apparently trying to form themselves into a human shape. There's a passage leading off of this chamber, but you need Move Mountains Lv.3 to get into it. There's a chest at the end of the passage with a Healing Potion and an Ice Lances scroll.
Now go back into the tunnel and head east and then north. If you keep going towards the northwestern corner you'll find yourself in a room with a couple Spore Beasts. Kill the beasts and then check the area for a Wand of Fire. Around the corner to the northwest is a Giant Slug. There's another little side room at the southern end with a couple more Spore Beasts and an Ash Crossbow and some Iron Bolts. Head back to the main central room with the control panel now.
Head into the Southwest passage until you come to a side passage leading north. If you follow this to the end you'll find yourself in a room with a few Poison Fungus. Once you've killed them walk along the western wall to get a ruby.
Now go back almost to the main central room and head down the passage to the south. This tunnel connects to the one that leads out of the central room going directly south. Head south when you get the option, and then west. You should find yourself passing through a swampy room. Go through the room and then head south again. This leads to yet another passage leading to the Lower Level. Go back to where a tunnel leads south just a little east of the entrance to the swampy area.
Head south and keep an eye on the western wall. When you see a little alcove go into it and push against the southern wall. This should lead into a secret passage. Go to the end and you'll come out on a little bank of the river. Walk along the bank to another alcove on the northern wall. Push against this wall and you'll enter another secret passage. There's a pool in here that provides healing. Go back through the secret passages and head a little bit further south. Take the passage to the east and watch the southern wall for the fourth passage leading to the Lower Level. Keep following this passage, going north and east whenever possible. You should eventually find yourself in a larger room. Check out the northeastern corner of the room, just north of the piece of paper. Push north against the wall and you'll find the body of an Avernite. This is one of the four that were sent to the surface before you.
Go back into the room with the paper, and through the door to the south, which is locked. There's a Bolt of Fire scroll in the desk, and another door leading to the east. This door requires Unlock Doors Lv.3 or an obscene amount of Tool Use skill. Inside that room you'll find a Fetid Zombie and a Wight guarding a spell book and a Radiant Robe. The spell book teaches Lightning Spray Lv.2 and Summon Aid Lv.2.
Back again into the room with the paper, and head out the door to the west. Follow the passage until it heads north. Instead of following the passage push against the western wall to enter yet another secret passage. At this end it is blocked by a Fire Barrier, which you can walk through, though it will damage you. There's a passage leading down to a laboratory. Go down and kill the slimes in each of the four corners of this section, then unlock the door to the north. There's a Null Bug in here, guarding a few fairly nice items, including a suit of Fungal Armor. Once you've gotten your goodies head back up the ladder. Go back the way you came, since the passage the other way is blocked by a Force Barrier, which you need Dispel Barrier Lv.2 or a Piercing Crystal to get through. Once you're out of the secret passage head north and then west, past the tunnel leading down. Go towards the southwestern corner to find the final passage leading to the Lower Level. Finish exploring this area to make sure you've killed all the slimes, then go back to the main central room and use the control panel.
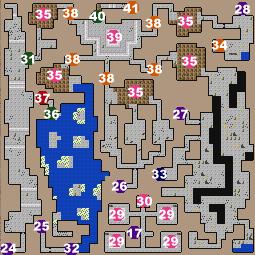
I usually start with the passage in the far Southwestern corner and work my way up to the one in the Northeast.
Push the button at the bottom and then head down to the southwestern corner and go down the passage. This area is infested with mauve slimes, who are the magic casting ones. I usually go into combat mode as soon as I enter this area and move all the way along the wide central corridor in combat mode so that I can attack the slimes before they can attack me or summon creatures. When you reach the end there will be an obelisk saying "Ha Ha". Head back down the passage hugging the eastern wall until you get a message about some cracks in the wall. Push against the wall here to go through a secret passage. The Slime Spawner is in here. Use distance attacks to kill it. If you go through the room and into the little passage you'll find a rune on the ground. There's one of these on the other side of each of the Slime Spawners, but you can't pass them until you've destroyed all five of the Spawners. Go back the way you came up to the Upper Level, and back to the control panel.
Push the next button up on the control panel and head to the passage that you have to pass through the swampy area to reach. Head down the passage and board the boat at the bottom. This is one of the more annoying sections, as you have to maneouver the boat along while being attacked by mauve slimes. Stop at every island you reach and use distance attacks to kill any slimes you can reach. There's a passage to the southwest, but there's nothing in it. In the northwest corner of the watery section is a small beach with a secret passage leading to a chest containing an Energy Potion and an Iron Greatsword. Now head up to the north. When you land your boat you'll immediately trigger the sleep field for this Spawner. Use any characters who didn't fall asleep to kill the Spawner and any slimes it's created. Check out the rune on the far side and then get back in your boat and go back the way you came.
Return to the control panel and push the third button up. This is the last passage on the southern portion of the map. Head down it and you'll find yourself in an area with three rooms leading to this sections Spawner. Once you get close enough to the Spawner to attack it the bodies in these rooms will rise up and become Zombies. Kill the Spawner and the Zombies, check out the rune and then make your way back to the Control Panel.
The second button from the top is for the passage just a little northwest of the main room. Go down the passage and you'll find yourself in an area with a lot of chasms. Use distance attacks to kill the slimes, since it would take quite a while to move around to that side of the chasm in combat mode, and you would probably suffer a fair amount of damage while you tried it. Don't worry, you can't fall into the chasm. Once you've dealt with the slimes, but before you go kill the Spawner, move back around to the western side of the chasm and explore the area against the western wall. There's an Empire Archer that's stuck back here. You can free him, though you don't get a reward for doing it. It's best to free him after the slimes are all dead, or he'll end up killing some of them and depriving you of the experience. Now make your way up to the north on the eastern side of the chasm. Kill the Spawner, check out the rune and go back up to the control panel.
Push the last button and make your way to the passage beyond all the dead bodies. Immediately to the southwest of the entrance is the passage to the Spawner, but first go down a little more south and kill the slimes and Zombies that are crowded around the corner. Touch the rune on the floor once they're all dead to regain a few spell points, but you can only use it once. Now go and kill the final Spawner. This time when you approach the rune on the far side it will let you pass.
Now you get to kill the Alien Slime. I don't recommend getting close to it, as it could kill a lower level character fairly quickly. Once you've disposed of the Alien Slime check out the northern wall. There's a secret passage here, and at the end of the passage is a rune etched on the ground. This rune is the evidence you'll need to return to Berra at Fort Emergence.
You have now completed the Slime Quest. Return to Krizsan to get your reward from Mayor Arbuckle, and to pick up Falko if you want him and have the space. Then head back to Fort Emergence to talk to Berra and Anaximander, and to pick up your reward from Levy after talking to Anaximander. The reward for the Slime Quest is an Invulnerability Elixir. I usually sell it right back to Levy so that I can have an unlimited supply of these.