I am writing this walkthrough from the perspective of having entered from the Giant's Forge, which is located near the southwest corner of the map.
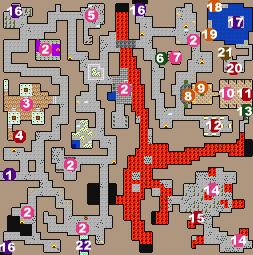
The first thing to be aware of is that there are Giants and Ogres through this entire area. I've marked their general location on the map, but that doesn't mean you won't run into some in other areas, so be prepared.
Head immediately to the far southwest corner, and take note of the passage leading up. This is one of three entrances to the Giant's Caverns.
Now head back north a little bit, and then to the east. This passage leads to the Giant's side of the Barrier seperating the Troglos and the Giants. You'll be able to pass through this passage once you complete the Concealed Tunnel dungeon, but for now it's as impenetrable as a solid wall.
Head north from the eastern end of the room. The first passage branching off to the west leads to the Giant's workroom, where they carve their stones. Continue heading north until you reach a passage leading east. This is another forge.
Once you've cleared the forge area, head into the passageway again and go north until the tunnel splits to the northeast and the northwest. Follow the passage northwest until you get to the northern edge of the map. Just east of here is a den with some Hulking Worgs and Worgs. Clear them out and then head to the northwest. There's a ladder leading up, which is the second passage up to the Giant Caverns.
Head south from here, following the passage until you reach some steps leading downwards on the western side. In here are three Nagas, a Hill Giant Chief and some Giants. Kill them all and then head to the southwest corner of the room. Go over the Naga's platform and look in the two chests. One of them contains a key, which you'll need shortly.
Head back towards the forge now, or rather to the fork in the passage just north of the forge. This time, head northeast and cross over the Lava using the bridge. At the northern end of the passage on this side of the bridge is the third and final passage leading up to the Giant's Caverns.
Go south down the passage, and check the eastern wall in the area shown on the map for a secret passage. This is the trash pit, which contains a Giant Slug. Watch out for the acid it might spit at you.
Continue following the passage until it loops around again to the north, with a small passage leading off to the east. Go through this passage and check the crypts. One of them contains the Lightning Spray spellshard, and another one contains a Blessed Robe.
Now go up the eastern of the two branches leading north in the main passage. Take note of the door on the eastern side, with the two obelisks. This is the door that the key you got from the Naga's lair will open. Once you get into the room approach the contol panel against the northern wall. Don't touch anything yet, just look at it, and take note of the labels near each button. You need to push the buttons in a specific order to open the portcullis to the east. In the order listed, push the buttons labelled Owu, Legov, Taful and Mung. This should open the portcullis. Unfortunately you can't go into combat mode right away, because you have to disarm two traps on your way in, so make sure you have the character with the best ability to take damage in front as you enter the room. There's a Demon and two Black Shades waiting for you. Once you've killed them, check all the chests. Most of them contain at least one item of note, but don't equip any jewellery or clothing until you've had it identified. You'll end up picking up a Pants of Sorrow and a Harm Charm. You'll also find the Barrier Tunnel Map and the Assassins Dagger. Once you've looked at it, you dont' really need to keep it, though make sure that you note the rough location of the Concealed Tunnel first.
Now it's time to have some real fun. Head down to the far southeast corner of the map, note that you'll have to cross over some lava to get there. When you get to the passage leading east with cobwebs at the beginning, stop and prepare for a tough battle. You're about to fight your first Dark Wyrms, and these things are really hard. I recommend Hasting, Blessing and casting any Shielding spells you have on at least your fighters. The easiest way to fight Dark Wyrms is to get right next to them, since this will force them to use a physical attack rather than their Darkness Breath. Darkness Breath can knock you down almost 200 hit points with a single hit, and Dark Wyrms get two attacks per round. Darkness Breath also casts Enfeeblement on your characters, so if they keep hitting you with it, you're going to be in a lot of trouble. Dark Wyrms are impervious to most magic, and spells that do damage them don't damage them very much. Their physical attacks are much weaker, so manouver your fighters right next to them as soon as possible. Then it's just a matter of hammering away at them until they're dead. Use your priest, if you have one, to heal your party whenever they need it, and try to keep at least your fighters hasted at all times. There are two Dark Wyrms in the first room, and one in the second. Once you've dealt with the Wyrms there's a Wyrmskin helmet on the ground in the southwest corner of the first room.
Now it's time to head up to the Giant's Caverns. For the purposes of my walkthrough, I went up the tunnel in the southwest corner.
You can't reach the northeast corner of the map from this level, but when you enter it from the Giant's Caverns the first thing you'll notice is that the only thing you can reach is a rune in the northwest corner. Go step on that rune and it will raise the bridge to the second rune in the west. Go step on that rune, and you'll now be able to cross the bridge to the south. There's a barrier blocking the passage here, and you'll need Dispel Barrier Lv.2 or a Piericing Crystal to get through. Once you're in this room check the chests for a variety of items including a Monkey Bracelet, which you don't want to equip, and a suit of Polished Plate Mail, which you do. Check the northwest corner for a tome that will teach you the spell Mass Curing Lv.3. Head back up to the Giant's Caverns once you've got the spell.