|
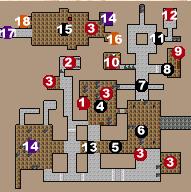
Upon first entering the Concealed Tunnel wander around to the areas you can reach and take note of the layout. There's some dressers in the second room which cointain a few magic crystals, and a room at the end of the passage just north of there that contains some more magic crystals and some rough diamonds. Find the three mirros you can access right away, and take note of the room in the southeast corner with a lot of mirrors blocked by a portcullis. Now we'll move onto the portion of the walkthrough that deals with using or destroying the beams.
Section 1: Accessing the Mirrors
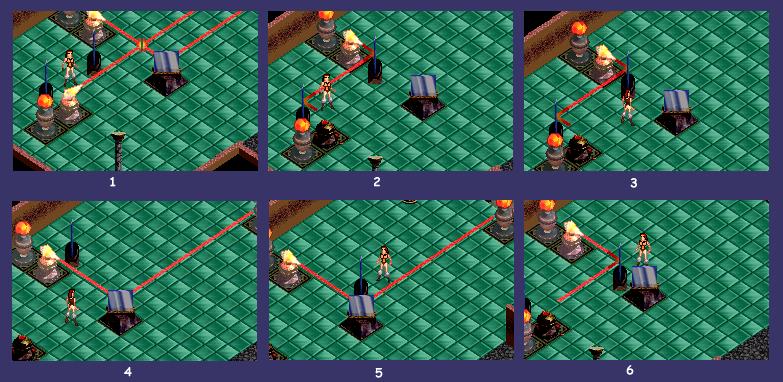
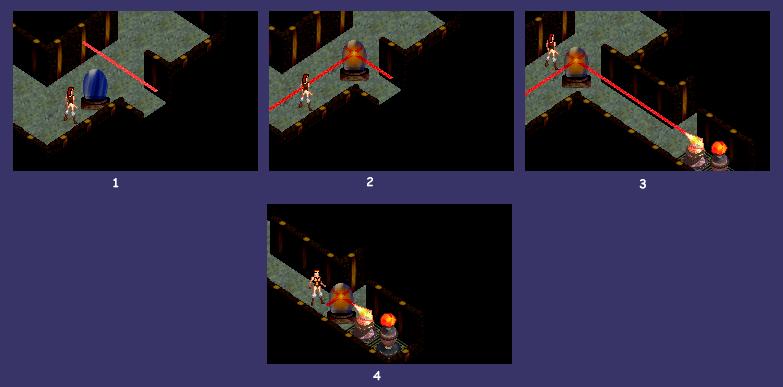
Though I forgot to put the picture in, the first thing you should do is get the second mirror shown in the pictures and put it against the wall in the location shown in the fifth picture. Once you have that done follow the steps shown in the pictures. The first two steps power up a crystal in the corridor running east/west at the bottom of the map. This crystal in turn powers up the crystal that operates the portcullis leading to the mirrors.
The last steps disable two of the beams in the room, making it easier for you to move around the map without having to make your way through a maze of beams. Once you've done this, it's time to get all your mirrors together. Don't forget to retrieve the two you used in this room, and the round mirror in the central passage near the storage room with the magic crystals and rough diamonds.
Section 2: Gathering Your Mirrors
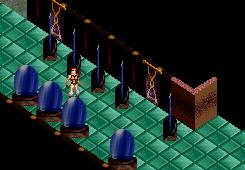
I like to gather all my mirrors here, since this area is central to where I'll be working with them, and it really gets to be a pain to go around collecting mirrors for everything I want to do. This picture shows all the movable mirrors in this area. If you have less than this you've missed some somewhere.
Next we'll move onto clearing the first room you entered, so you can get through the portcullis the north.
Section 3: Clearing the Portcullis
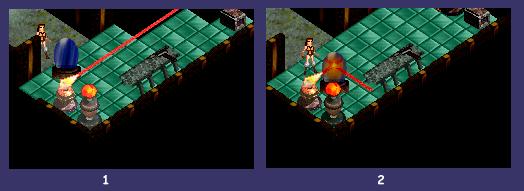
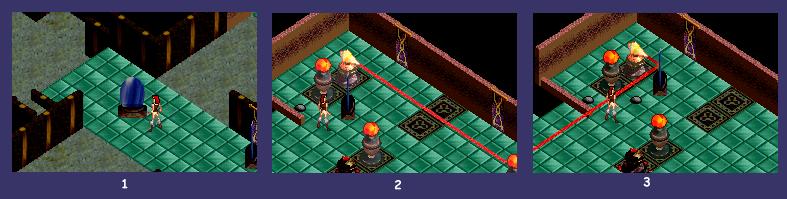
Unfortunately, there isn't any way to completely get rid of the beams in this room, so you're always going to have one left to bother you, but follow the steps shown in the pictures, making sure to follow the last step, which means positiong the mirror just north of the immovable mirror. This clears most of the room of beams, and now you can progress through the portcullis to the north. Unfortunately there's another beam almost right away blocking your path, so our next step will be to clear away this annoyance.
Section 4: Clearing the Passage
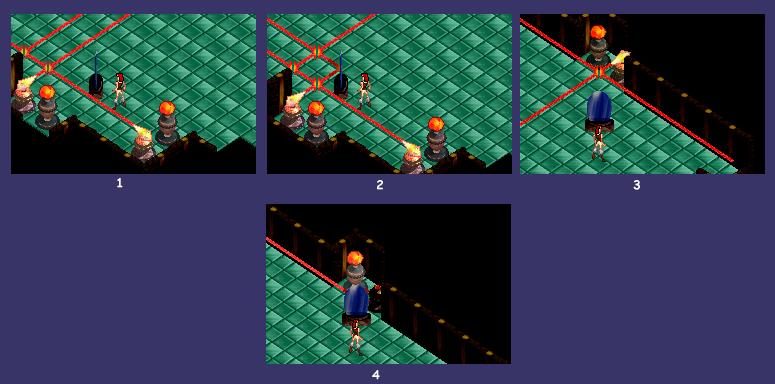
This section is pretty simple. Just follow the pictures shown above and you shouldn't run into any problems. Once you've cleared this beam out of the way check out the northern section of the passage. There's a room to the north blocked by three stalactites. Clear them out using a couple Stoneshatter Crystals or Move Mountains Lv.2 to find a Regenerate Mind Crystal, as well as a few other things.
Check out the passage leading south to a chest blocked by a beam. So now on to the next section to reach the chest.
Section 5: Reaching the Chest
This is probably the simplest and least rewarding of the beams. Follow the pictures, making sure that you're using the right shape mirror, otherwise you're going to trap yourself in the end of the passage. The chest only contains a couple Fine Crystals.
The next section is the most rewarding once you've gotten past the beam, since it leads to a few chests with some nice items, including a suit of Mauling Leather.
Section 6: Reaching the Mauling Leather
Just follow the pictures to gain access to the last area in this section of the concealed tunnel. Once you get the mirror into it's final position you'll have to step diagonally into the room containing the chests. Make sure when you're entering and exiting the room that you don't dislodge the mirror or you'll be stuck with not way to get out of the town.
Once you've gotten the items from the chest go back to where the mirrors are all lined up to power up the last crystal powering the teleporter.
Section 7: Powering up the Teleporter
Follow the steps shown in the pictures to power up the teleporter. Make sure you have the first mirror in position before moving the second mirror to redirect the beam.
Once you've done, head over to the teleporter. Check and make sure that all four of the crystals around it are orange, and then head through the teleporter to the last section of this level of the Concealed Tunnel.
Section 8: Through the Portal
This is another fairly one, but if you do make a mistake don't worry. There's a lever just to the south of the portal that resets the mirrors to their original locations if you've messed up. Once you're through take note of the room just to the north of the passageway out of the room. The lever in here will turn off the beams on your return trip.
You need Move Mountains Lv.3 to get through this passage. Once you're through we'll deal with the last section of the walkthrough.
Section 9: Bringing Down the Barrier
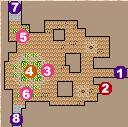
- Entrance from first part of Concealed Tunnel
- Stoneshatter and Searing Crystal in chest
- Doomguard
- Shatter the crystal
- Giants appear here after you shatter the crystal
- Troglos appear here after you shatter the crystal
- Passage to Lower Giant Caverns
- Passage to under Castle Troglo
Upon first entering this section, go around the corner to the southeast corner. There's a Stoneshatter Crystal and a Searing Crystal in the chest here. There's also some crystals and some fine crystals in some pots in the northeast corner.
Now head straight down the passageway to the west. There's a doomguard in this area. Doomguards are annoying creatures who form copies of themselves every time you damage them without killing them. Adding insult to injury, you only get experience when you kill the original copy.
Once you've dealt with the doomguard approach the crystal in the center of the pillars. When given the option to smash it, do so. This will cause a bunch of Troglos to appear in the south of the room, and a bunch of Giants to appear in the north of the room. It's your choice whether to kill them yourself or let them kill each other. If you want them to kill each other go back up the passage leading to the first area of the Concealed Tunnel. They'll be dead when you return.
Once the Giants and Troglos are disposed of approach the place where the crystal used to be. You'll automatically pick up the evidence you need to take back to Berra in Fort Emergence. Notice that you can now go through the passages leading to the Lower Giant Caverns to the north and under Castle Troglo to the south.
Now it's time to head back to Fort Emergence. Talk to Berra and show him your evidence, then go talk to Anaximander. He'll tell you to go talk to the Vahnatai, which you should do. While you're in Fort Emergence go talk to Commander Johnson in the dining hall to find out the location of the Bunker. Once you've talked to the Vahnatai you should go visit the Bunker and talk to ??. Also, if you go down to the Tower of Magi, X will now teach you Fireblast Lv.3.
|